
For those of you who were with us last year for Halloween, we had a Spooky Infrared Challenge, 2015 CHALLENGE WEEK 43: SPOOKY HALLOWEEN INFRARED ANIMATED GIF. I suggest you read it as it is still full of useful tips for this challenge.
Post from RICOH THETA. – Spherical Image – RICOH THETA
https://theta360.com/widgets.js
It was challenging above and beyond the photography aspect as it had many technical twists of fabricating a series of infrared images and animating them in post production. For this Challenge, I want us to focus on all the proper aspects of photography and create a well balanced image.

The above image is your stereotypical IR image from a converted DSLR. In this case, a Nikon D300s converted to full spectrum with a 720nm filter on the lens. You get your bluish tones with whitish vegetation. Being a converted camera you also have the luxury of maintaining your exposure speed.
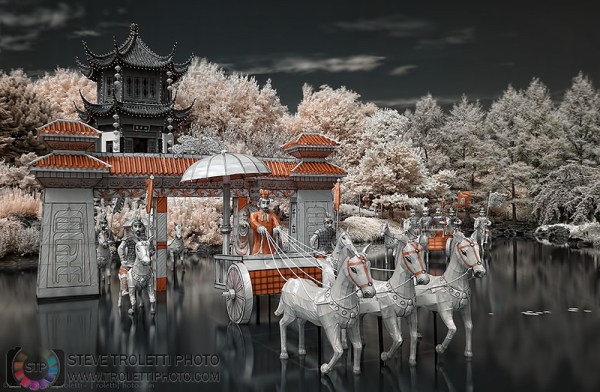
In contrast, the above image is created with a non-converted entry level Nikon DSLR with it’s plastic kit lens. (BTW: those cheap plastic kit lens from Nikon are great for IR photography) I composed my image with the camera set atop a tripod. Once everything looked good, I slipped on a Cokin IR filter and made a few exposures between 15 and 30 seconds. It’s that long exposure time that gave me the slick mirror like look on the water. The long exposure also lets in more natural light which in turn contaminated the true IR look. However the final image was an award wining image thanks to this unusual look.

The above image is with the same basic Nikon DSLR. The only difference is I used a Hoya R72 720nm filter. It’s an image of a waterfall in winter from high above. Again a long exposure, especially due to the fact that it was an overcast day with a non-converted camera.

What if you don’t have a infrared filter or a converted camera? Not a problem, even your smartphone will do. I’ve been giving out some D.I.Y. links over the years to make your own filter. A very simple process, buy a positive slide film, don’t expose it, get it processed unexposed. Once you get it back, just cut it to size. Naturally that just works for smaller cameras and phones. There are some exceptions, my fisheye lens has a tiny flat back-end allowing me to tape the film to it. The result, this church above…

Here’s an other one with the exact same D.I.Y. setup. I had to put it into practice as I’m recommending it to others. Basically I bought a slide film on liquidation and got it processed immediately, unexposed. All for under $15. I imagine that the lower ISO film will produce a better image, at least be a better IR filter, but that’s just a guess.

Let’s focus on the challenge. I would like you to create an Infrared Image with a mix of vegetation and man made objects. Using the above image as a baseline, you should have a pretty good idea of the direction we’re taking. Remember that even though there’s a great deal of science behind IR photography, the end result is much more art then science.

Your results are going to vary greatly from one member to an other. The reason is very simple, White Balance, Filter, Lens and Camera combinations will be different. Then there’s the post processing. Some of you may get IR Hot-Spots with a specific lens and you may choose to convert to B&W, while others may choose to conquer the mess of colors in front of them, colors that are just far from reality. The above images demonstrate exactly my point. Two different Lens/Filter combinations gave me two completely different results.

What you’ll need to complete your challenge:
- A Tripod – As usual I always suggest a tripod. It keeps your camera steady and maintains your composition, giving you time to think and experiment. For non-converted cameras it’s a must as you will need to keep your camera steady for long exposures.
- An Infrared Filter – There’s no getting around it, we need to block out visible light as much as possible, letting only the upper spectrum of light into the camera. Filters vary greatly. Your standard IR filter is 720nm but you can find them as low as 560nm. Those in the 800nm spectrum will only produce a B&W image. The D.I.Y. approach is a economic way to experiment. You can even stack two filters together.
- A Cable Release – A remote way to trigger your camera is always a good way to increase stability with a tripod.
WARNING : NEVER LOOK DIRECTLY INTO THE SUN THROUGH AN IR FILTER
IT MAY APPEAR SAFE BUT WILL STILL DAMAGE YOUR EYES
CLICK HERE for a DIY Infrared Filter search on Google
CLICK HERE for an Infrared Post Processing search on Google
The rules are pretty simple:
- Post one original photograph (Your Image) shot each week per theme posted on this blog to Google+, Facebook, or Flickr (or all three). Tag the photo #photochallenge.org or #photochallenge2016.
- The shot should be a new shot you took for the current weekly theme, not something from your back catalog or someone else’s image.
- The posted image should be a photograph, not a video.
- Don’t leave home without your camera. Participating in the 2016 PhotoChallenge is fun and easy.


SanDisk 64GB Extreme PRO SDXC UHS-I Memory Card - C10, U3, V30, 4K UHD, SD Card - SDSDXXU-064G-GN4IN
27% Off
Now retrieving an image set.


You must be logged in to post a comment.